
Choosing the right credit card box size starts with the dimensions of the card, but the card itself is only one part of the packaging. The box must also accommodate its insert, any additional cards or printed materials, and the space needed for easy placement and removal. A well-fitted design protects the contents while creating a clean, professional presentation.
For most standard credit cards, the starting measurement is 3.375 × 2.125 inches (85.60 × 53.98 mm), with a nominal thickness of approximately 0.030 inches (0.76 mm). These are the standard ID-1 card dimensions described in ISO/IEC 7810. However, these measurements describe the card, not the finished packaging. The correct box dimensions depend on the number of cards, insert design, material thickness, and intended use.
Whether you are packaging a single gift card, a membership card, a promotional card set, or a premium presentation kit, the best approach is to measure the complete packed configuration before selecting a box. This helps prevent tight fits, unnecessary empty space, loose inserts, and avoidable packaging changes during production.
Credit Card Box Sizes: A Quick Answer
There is no single box size that fits every credit card packaging project. A standard credit card measures approximately 3.375 inches long, 2.125 inches wide, and 0.030 inches thick. The box should be sized around the card or card set, the insert, the closure, and the packaging material—not simply around the card’s outside measurements.
Use these starting points when planning your packaging:
- One standard card: Begin with the card’s actual dimensions and design a fitted cavity that allows the card to sit flat and be removed comfortably.
- Multiple cards: Calculate the total stack thickness and provide an insert or compartment that holds the cards securely.
- Gift or presentation packaging: Allow room for a finger notch, pull tab, sleeve, or other removal feature where needed.
- Premium rigid boxes: Account for the thicker walls, internal tray, lid construction, and any decorative lining.
- Card sets with printed materials: Include envelopes, instructions, sleeves, or other components in the final internal sizing plan.
- Shipping or fulfillment: Consider the outer dimensions, closure strength, and protective packaging needed for the distribution method.
The most important distinction is between card dimensions, usable internal box dimensions, and finished external box dimensions. They are related, but they are not interchangeable.
Standard Credit Card Dimensions for Packaging
A standard credit card is based on the ID-1 format specified by ISO/IEC 7810. This format is widely used for payment cards and many identification cards. It provides a reliable starting point for designing a credit card presentation box, although the physical cards and finished products should still be measured before production.
| Measurement | Standard starting dimension | Packaging consideration |
|---|---|---|
| Length | 3.375 in / 85.60 mm | Check the longest edge of the card |
| Width | 2.125 in / 53.98 mm | Check the widest edge |
| Thickness | About 0.030 in / 0.76 mm | Verify actual card thickness, especially for specialty cards |
| Shape | Rectangular with rounded corners | Match the insert cavity to the card outline where appropriate |
| Orientation | Landscape or portrait | Determine how the card will sit in the box |
These are reference dimensions, not a finished box specification. A metal card, unusually thick promotional card, protective sleeve, or multi-card stack may require a different insert design.
For an authoritative reference, consult the ISO/IEC 7810:2019 identification card standard. For a consumer-friendly explanation of standard credit card measurements, see Chase’s overview of credit card dimensions.
Why card dimensions do not equal box dimensions
The card may fit within a cavity that is only slightly larger than its outline, but a real packaging structure also has tolerances, material thickness, folds, and an insert that needs to fit inside the box. A tight cavity can make the card difficult to remove; an oversized cavity can allow it to shift during handling.
For example, a box designed for one bare card may not work for the same card inside a paper sleeve. The sleeve changes the effective length, width, and thickness of the packed item. The same principle applies when adding a backing card, booklet, protective layer, or second card.
If you are planning a wider packaging project, the principles in our guide to choosing the right packaging materials can help you consider the relationship between structure, board type, protection, and presentation.
Understanding Box Dimensions: Length, Width, and Depth
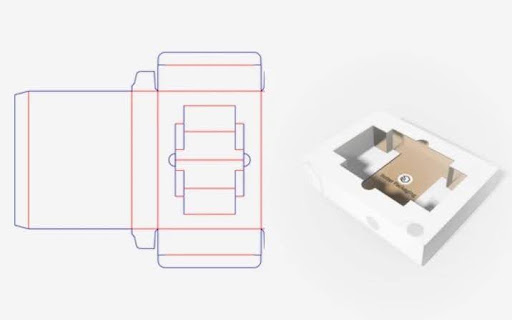
The three main dimensions of a box are length, width, and depth or height. For credit card packaging, these measurements should be established around the finished interior rather than estimated from the outside of a sample box.
- Length: The internal distance along the card’s longer side.
- Width: The internal distance across the card’s shorter side.
- Depth: The usable vertical space available for the card, insert, and other packed components.
For a flat card, the required depth may be relatively small. However, the complete structure may need more space for a raised insert, finger notch, protective layer, decorative lining, or multiple cards stacked together.
Internal dimensions versus external dimensions
Internal dimensions describe the usable cavity where the card and insert sit. External dimensions describe the finished outside of the box. The difference depends on the board thickness, wall construction, folds, lid design, and other structural features.
| Dimension type | What it measures | Why it matters |
|---|---|---|
| Internal length | Usable length inside the box | Helps determine whether the card fits without bending or catching |
| Internal width | Usable width inside the box | Controls side-to-side fit and insert alignment |
| Internal depth | Available space from the base to the inside top or lid | Determines whether the card and insert fit vertically |
| External length and width | Overall outside footprint | Matters for storage, shipping, display, and outer packaging |
| External depth | Total finished box height | Affects stacking, storage, and the overall presentation |
A frequent design mistake is to specify the outside measurements and assume the card will fit inside. Thick rigid board, a wrapped lining, or a raised tray can reduce the available interior space. Always confirm which dimensions the supplier is quoting.
If your project involves a new structure rather than a ready-made box, the principles in our article about measuring a box accurately can help you define the measurements consistently.
How to Measure a Card Before Ordering Custom Packaging
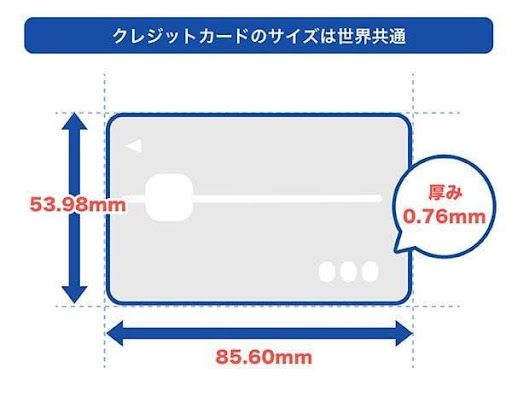
Accurate measurements make it easier to create a box that looks intentional and works as expected. Before deciding on credit card box sizes, measure the card itself and then measure any components that will be packed with it.
Step 1: Measure the card’s length and width
Place the card on a flat surface. Use a ruler or caliper to measure its longest and widest points. Record the measurements in inches or millimeters, and use the same unit throughout the packaging specification.
Do not rely entirely on a generic standard if the actual card is available. Specialty cards, metal cards, access cards, gift cards, and promotional pieces may differ from a conventional bank card.
Step 2: Measure the card thickness
A standard plastic card is thin, but thickness becomes more important when multiple cards are stacked or when the design includes a sleeve or backing. Measure the actual card where practical, especially if the package must accommodate several components.
Step 3: Identify everything that goes inside
List all items that must fit in the finished box, such as:
- One or more cards
- A paper sleeve or protective layer
- A printed message or instruction card
- A booklet, certificate, or membership insert
- A pull tab or card-removal feature
- A fitted tray or decorative lining
Measure the complete arrangement, not just its individual components. A card placed at an angle or under a retaining flap may need a different cavity from a card that lies flat.
Step 4: Determine the removal method
Think about how the recipient will take the card out. A tightly fitted cavity may hold the card securely but make removal inconvenient. A finger notch, ribbon pull, recessed edge, or lift tab can make the experience easier without requiring excessive clearance around the card.
Step 5: Confirm the box and insert together
The insert must fit the box, and the card must fit the insert. These are two separate fit checks. A correctly sized card cavity does not help if the insert itself is too wide, too tall, or too deep for the finished box.
Step 6: Approve a physical sample when fit is critical
For premium packaging, unusual card materials, complex inserts, or larger production orders, a physical sample helps confirm dimensions, closure, alignment, and removal. A digital drawing can communicate the design, but it cannot fully demonstrate the feel of the materials or the actual fit.
For broader guidance on planning a finished packaging structure, explore our custom packaging design resource.
How to Calculate the Right Credit Card Box Size
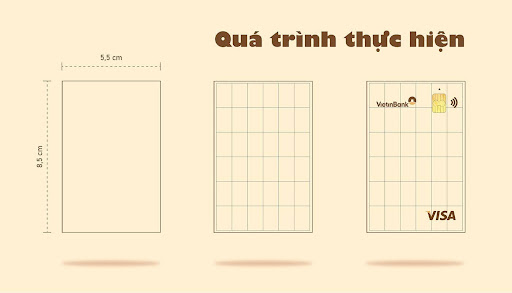
A practical sizing method starts with the packed product and works outward to the finished structure.
Basic principle: the internal cavity must accommodate the card and insert, while the external dimensions must accommodate the internal cavity plus the box’s structural materials.
For a single card lying flat, use this sequence:
- Record the card’s measured length, width, and thickness.
- Decide whether the card sits directly in the box or inside an insert.
- Establish the cavity dimensions required by the insert design.
- Add the space needed for removal features, sleeves, or other components.
- Confirm the finished insert fits within the box’s internal dimensions.
- Account for board thickness and construction to determine the external dimensions.
- Check the fit with a sample before final approval.
There is no universal clearance allowance that works for every material or manufacturing process. The right tolerance depends on the insert material, cutting method, box construction, wrapping, and how firmly the card needs to be held. Ask the packaging supplier to confirm the recommended fit for the specific design.
Example: A single-card presentation box
Imagine a business needs a small box for one standard-sized gift card. The card will sit flat in a fitted paperboard insert, with a finger notch for removal and a lid that closes over the insert.
The design team should first measure the actual card. Next, it should define the insert’s outside dimensions and the card cavity. Then it should confirm that the insert fits inside the box without buckling, lifting, or interfering with the lid.
The finished box should not be selected from the card dimensions alone. The insert, lid depth, board thickness, and removal feature all influence the required dimensions. A sample is the best way to confirm the complete assembly.
Example: A box for a stack of cards
A box for ten cards requires a different depth from a box for one card. The card stack’s total thickness, any band or sleeve, and the insert’s retaining structure must all be considered. If the box will hold different card quantities, separate insert designs or different box depths may be more practical than forcing every version into one configuration.
For additional ideas about balancing fit and shipping requirements, our article on ecommerce packaging considerations covers the broader role of packaging in fulfillment and customer experience.
Choosing the Right Insert for Credit Card Packaging
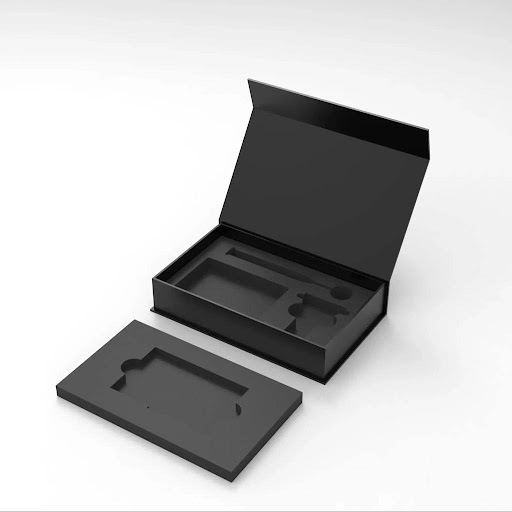
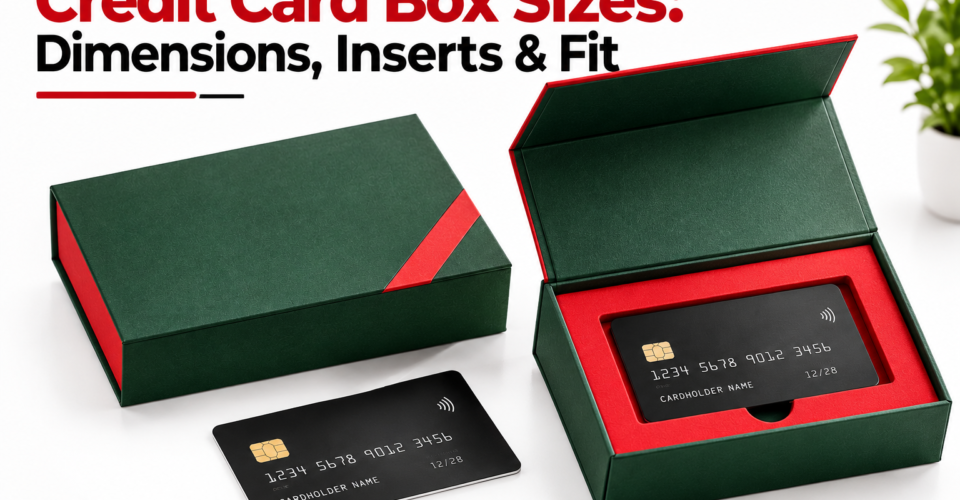
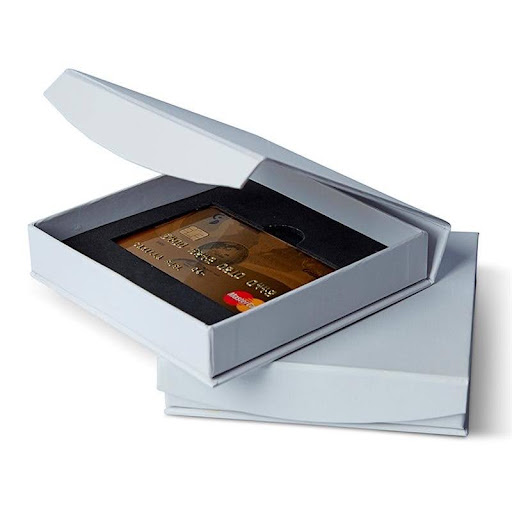
The insert is the component that positions the card inside the box. It can prevent unwanted movement, organize multiple pieces, protect sensitive surfaces, and improve the presentation when the lid opens. The right choice depends on the card’s material, the packaging budget, the desired appearance, and the conditions the package will experience.
1. Die-cut paperboard inserts
Paperboard inserts are useful when the packaging needs a neat, lightweight, paper-based structure. A die-cut cavity, slot, or retaining tab can hold a card in position while keeping the interior visually consistent with the outer box.
They are worth considering for gift cards, membership cards, promotional kits, printed card sets, and other lightweight products. The insert design should account for the card’s thickness, the board’s stiffness, and the method used to remove the card.
2. Foam inserts
Foam inserts can provide cushioning and a tailored cavity for products that need additional protection. They may be suitable for specialty cards, premium kits containing other components, or packages where a softer interior is part of the intended presentation.
Foam is not automatically the best option for every card. A flat plastic card may not need cushioning, while a premium kit containing several delicate items may benefit from separate foam cavities. Consider the material’s appearance, thickness, environmental requirements, and compatibility with the overall packaging design.
3. Molded or formed inserts
A formed insert can create a shaped recess that holds a product or a group of components in a consistent position. This option may be useful for packaging programs with specific presentation requirements or multiple items arranged within one box.
The design needs to be evaluated against tooling requirements, order quantity, production method, and the intended product fit. For a simple flat card, a less complex insert may be sufficient.
4. Paper sleeves and card holders
A paper sleeve or holder can protect the card’s surface and create another opportunity for branding or printed instructions. It can also make the card easier to handle when the recipient opens the box.
However, the sleeve must be included in the size calculation. If the card is supplied in a sleeve, measure the sleeved card rather than using the bare card’s dimensions alone.
Insert comparison table
| Insert type | Potential advantages | Best suited to |
|---|---|---|
| Die-cut paperboard | Lightweight, customizable, coordinated paper-based presentation | Single cards, gift cards, promotional sets |
| Foam | Cushioning and shaped cavities | Specialty products or multi-item premium kits |
| Molded or formed insert | Consistent shaped placement | Complex layouts or repeatable presentation systems |
| Paper sleeve or holder | Surface protection and additional branding space | Gift cards, membership cards, printed card products |
The best insert is the one that meets the project’s fit, protection, presentation, and production requirements without adding unnecessary complexity.
For related material and structural options, explore custom cardboard boxes and custom rigid packaging. These options can help frame the choice between a lightweight folding structure and a more substantial presentation box.
Selecting the Best Box Style for Credit Cards
The appropriate box style depends on how the card will be presented, distributed, and used. A card sent in a standard mailing may need a different package from a premium membership card handed to a customer in person.
Folding cardboard boxes
Folding cardboard boxes are worth considering for lightweight card packaging and printed promotional materials. They can support branded artwork and can be designed with a fitted paperboard insert, depending on the structure and manufacturing method.
This style may work well when efficient storage, a printed exterior, and a relatively lightweight package are priorities. Confirm that the finished construction provides the necessary rigidity and that the insert does not deform during packing.
Rigid presentation boxes
Rigid boxes provide a more substantial structure and can support a premium opening experience. They may be suitable for VIP membership cards, corporate gifts, premium gift cards, branded access cards, or card sets packaged with certificates and other materials.
A rigid box generally has thicker walls than a folding carton, so the internal dimensions must be planned carefully. A fitted tray, wrapped lining, or decorative insert can reduce the usable cavity. Explore custom rigid boxes for premium presentation when the appearance and feel of the package are important to the recipient experience.
Mailer boxes
Mailer boxes are primarily designed around shipping and fulfillment requirements. They may be appropriate when a card is part of a larger welcome kit, subscription package, onboarding pack, or branded shipment rather than a standalone card presentation.
For a single card, a mailer may be unnecessarily large unless it serves a wider purpose. When the package contains additional items, assess how the card will be held in place and whether the overall structure protects the contents during transit. See custom mailer boxes for ecommerce packaging for a relevant packaging format.
Kraft boxes
Kraft packaging may suit brands seeking a natural-looking, understated appearance. It can be considered for membership kits, gift card sets, branded promotions, or products where the visual identity favors a simple paper-based aesthetic.
Material appearance alone does not determine the box’s protective performance. Board construction, size, insert design, closure, and handling requirements still need to be considered. You can explore kraft packaging box options when comparing styles for a project.
Display boxes
Display boxes are designed to present products visibly, often at a retail counter or point of sale. They may be relevant for packaged card products sold in stores, but they are not necessarily the best format for a single card that needs a compact, enclosed presentation.
If cards will be displayed in a retail environment, consider visibility, product access, stability, and how the box will be replenished. Bluebird’s custom display boxes provide a relevant starting point for display-oriented packaging.
Which box style should you choose?
| Packaging requirement | Style to consider | Key design check |
|---|---|---|
| Lightweight, printed card packaging | Folding cardboard box | Insert fit and structural stiffness |
| Premium gift or membership presentation | Rigid presentation box | Interior clearance, lid depth, and finish |
| Card included in a shipped kit | Mailer box | Movement control and shipping protection |
| Natural, understated brand presentation | Kraft box | Material suitability and print appearance |
| Retail display of packaged cards | Display box | Visibility, access, and stability |
These are starting points rather than fixed rules. The right design should reflect the actual product, intended recipient, and distribution method.
How Many Cards Will the Box Hold?
The number of cards changes the required internal depth, insert configuration, and sometimes the overall box style. Before finalizing the dimensions, determine whether the package will hold one card, a stack of identical cards, or a collection of different cards and printed components.
Single-card packaging
For a single card, the insert can use a shallow cavity or slot that keeps the card flat. A finger notch or pull tab can improve removal. The finished cavity should hold the card securely without making it difficult to lift out.
Multiple cards stacked together
For a stack, measure the complete stack rather than multiplying a nominal card thickness and assuming the result will be exact. Card thickness can vary, and coatings, sleeves, or bands can affect the packed dimensions.
The insert should also account for the stack’s orientation. Cards arranged horizontally may require a different cavity from cards stored vertically or separated by dividers.
Card sets with accessories
Some packages include more than cards. A membership kit, for example, might contain a card, a welcome letter, a small booklet, or a printed certificate. In these cases, the internal layout should be designed around each component’s location.
Separate compartments can improve organization, but they also use space and add structural complexity. A single insert with several cavities may be preferable when the items need to remain aligned and the overall layout is simple.
Custom Printing and Finishing for Card Boxes
Printing and finishing help the package communicate a brand’s identity. For a card that represents a membership, reward, financial service, or premium gift, the box may be the first physical impression a recipient receives.
The design should make the brand recognizable without compromising readability or the practical function of the packaging.
Printing options
Depending on the chosen material and production method, custom card boxes may support logos, brand colors, product names, instructions, QR codes, and other artwork. Artwork should be prepared using the supplier’s approved dieline so that important elements do not land on folds, cuts, glue areas, or covered surfaces.
Our resource on packaging printing methods and artwork provides further context for planning the printed design.
Finishing options
Common finishing choices include matte or gloss lamination, foil accents, embossing, debossing, and spot UV. Availability and suitability depend on the material, construction, artwork, and manufacturing process.
Use finishing selectively. A small foil logo, for example, may be more effective than applying several effects to every surface. The goal is to make the packaging feel consistent with the product and brand rather than adding decoration for its own sake.
For more detail, see our overview of packaging finishes and their visual effects.
Keep the insert and exterior design coordinated
The exterior and interior should work as one presentation. A premium printed lid may look unfinished if the insert is poorly aligned, while an elaborate interior may not be necessary for a simple promotional card.
Consider the opening sequence, logo placement, card orientation, insert color, and visibility of any message beneath the card. A sample helps reveal whether the complete experience feels balanced.
What Affects the Cost of Custom Credit Card Boxes?
The cost of custom credit card packaging depends on the complete specification, not just the size of the box. A small box may still require a complex insert, specialized materials, custom printing, or several finishing steps.
Important cost factors include:
- Box structure: Folding cartons, rigid boxes, and more complex constructions involve different production processes.
- Material choice: Board type, thickness, lining, and insert materials affect the specification.
- Insert complexity: A simple card slot is different from a multi-compartment tray or a shaped insert.
- Printing requirements: Artwork coverage, color requirements, and printing method can influence production.
- Finishing: Foil, embossing, debossing, and other treatments may add steps.
- Order quantity: Production setup and unit costs vary with quantity and manufacturing method.
- Assembly and packing: A box supplied flat may have different handling requirements from one that is assembled and packed.
- Sampling and revisions: Structural changes after a sample review can affect timing and project cost.
If budget is a key consideration, simplify the design where possible without sacrificing necessary protection or usability. Compare structures using the same requirements rather than comparing box prices without considering what is included.
Bluebird’s custom packaging cost guide can help you understand the wider factors involved in specifying custom packaging.
How to Avoid Common Credit Card Box Sizing Mistakes
A well-designed box starts with accurate measurements, but several common errors can still cause fit and presentation problems.
| Common mistake | Why it causes problems | Better approach |
|---|---|---|
| Using card dimensions as the final box size | Leaves no allowance for the insert or structure | Specify the complete internal cavity |
| Measuring only the outside of a sample | Does not reveal usable interior space | Record internal and external dimensions separately |
| Forgetting sleeves or backing cards | The packed item becomes larger than expected | Measure the full packed configuration |
| Making the insert cavity too tight | Card removal becomes difficult or may damage the package | Confirm suitable fit and removal clearance with the supplier |
| Making the cavity too loose | The card can move or sit unevenly | Test the insert with the actual card |
| Ignoring board thickness | The interior may be smaller than planned | Calculate the structure from internal dimensions outward |
| Choosing a box style before defining its use | The package may not suit display, shipping, or presentation needs | Define the distribution and customer experience first |
| Skipping a sample | Problems may appear only after production | Review a physical sample when fit is important |
A useful way to avoid these issues is to document the card measurements, insert dimensions, box dimensions, materials, closure, and finished artwork in one packaging specification. This gives everyone involved a consistent reference.
A Practical Checklist Before Ordering Card Packaging
Use this checklist when preparing a packaging brief for a supplier.
- Measure the actual card’s length, width, and thickness.
- Confirm how many cards the box will hold.
- List all additional contents, including sleeves and printed materials.
- Choose whether the card will sit flat, stand vertically, or be presented at an angle.
- Select an insert type suitable for the card and intended use.
- Specify internal dimensions separately from external dimensions.
- Confirm board thickness, lid construction, and insert depth.
- Decide how the recipient will remove the card.
- Select the box style based on presentation, storage, and shipping needs.
- Prepare artwork on the approved dieline.
- Confirm printing and finishing requirements.
- Review a sample if the fit, structure, or finish is critical.
- Approve the final dimensions and packed configuration before production.
A clear specification helps reduce misunderstandings and makes it easier to compare packaging proposals on an equivalent basis.
Frequently Asked Questions About Credit Card Box Sizes
What size is a standard credit card?
A standard ID-1 card measures approximately 3.375 inches long by 2.125 inches wide (85.60 × 53.98 mm), with a nominal thickness of 0.030 inches (0.76 mm). These are card dimensions, not the dimensions of the box needed to package it.
What size box do I need for a credit card?
The required box size depends on the card’s actual dimensions, insert design, material thickness, and whether additional components are included. Start by measuring the card, then determine the internal cavity needed for the complete packed arrangement. Confirm the finished structure with a sample when necessary.
Should I use internal or external dimensions when ordering a custom box?
Use internal dimensions to specify the space available for the card and insert. External dimensions describe the finished outside of the box and are important for storage, shipping, and display. Ask the supplier to label both clearly in the specification.
Do credit card boxes need inserts?
Not every card box needs a separate insert. A simple sleeve or a suitably designed box may be sufficient for some applications. An insert becomes useful when the card must stay in a particular position, when multiple components need organizing, or when the package requires a more controlled presentation.
What is the best insert material for credit card packaging?
Paperboard can suit lightweight card packaging and printed presentations. Foam can be useful when cushioning or a soft interior is needed, while formed inserts may work for more complex layouts. The best choice depends on protection requirements, presentation, material compatibility, cost, and production method.
Can I make a box for several credit cards?
Yes. A multi-card box can use a stack cavity, individual slots, or separate compartments. Its dimensions should be based on the actual cards and any sleeves or dividers. Measure the complete arrangement and confirm that the insert fits inside the finished box.
Are rigid boxes suitable for gift cards and membership cards?
Rigid boxes can be suitable when a substantial structure and premium presentation are important. They may be appropriate for VIP memberships, corporate gifts, premium gift cards, and branded welcome kits. Their thicker walls and any fitted insert must be included in the sizing calculations.
How can I stop cards from moving inside a box?
Use an insert or cavity designed around the card’s actual dimensions, and consider the way the package will be handled. A finger notch or pull tab can help with removal while the rest of the insert controls positioning. The appropriate fit should be tested with the real card rather than estimated from a drawing alone.
What information should I send a packaging supplier for a quote?
Provide the card dimensions, quantity per box, number of boxes required, insert requirements, preferred material and structure, printing and finishing preferences, and intended use. Include any sleeves or accessories that must fit inside. A reference image or sample can also help communicate the intended result.
How do I get a custom credit card box made?
Start with a packaging brief that defines the card, the complete contents, the intended presentation, and the required protection. A packaging supplier can then help determine a suitable structure, insert, material, and dimensions. Review the final specification and a sample when needed before approving production.
Final Thoughts: Choosing Credit Card Box Sizes That Fit Properly
The best credit card box size is the one designed around the complete packed product—not simply the standard dimensions of the card. Accurate measurements, a suitable insert, clearly specified internal and external dimensions, and a box structure matched to the intended use all contribute to a better result.
For a straightforward card package, a simple paperboard structure may be enough. For a premium gift, membership kit, or branded presentation, a fitted insert and rigid box may create a more deliberate opening experience. When the card is part of a larger shipment, the design should also account for handling and fulfillment.
Before placing an order, measure the actual card, list every component, decide how the card should be presented, and confirm the finished fit. These steps help create packaging that looks professional, holds the card securely, and supports the brand experience.
Planning a custom card packaging project? Contact Bluebird Packaging to request a quote with your card dimensions, preferred box style, insert requirements, and branding preferences. The more complete your specification, the easier it is to evaluate the right packaging solution.
Additional Packaging Considerations
When comparing box structures, consider whether your project needs the lightweight construction of a paperboard carton or the added strength of a corrugated structure. Our comparison of cardboard and corrugated boxes explains the differences, while our guide to corrugated packaging applications provides further context for packages that need additional structural support.
Material selection also affects the appearance, handling, and end-of-life considerations of the finished package. Businesses reviewing these requirements can explore sustainable packaging approaches and packaging recycling considerations before choosing materials and finishes.
If you’re comparing different structures for a new product, our overview of common packaging types and their uses can help narrow the options. Smaller businesses developing branded card packaging may also find useful ideas in our guide to packaging solutions for small businesses.
For projects where several components must work together, explore custom packaging solutions and our broader overview of packaging costs and budgeting. You can also browse the Bluebird Packaging homepage to explore the company’s packaging offerings or use the contact page to discuss a specific requirement.